
In this post, we will quickly go through the detailed steps needed to create and release your SAP Transport of Copies or TOC. We will additionally cover the purpose of Transport of Copies. As a bonus, we will also include an insight on Parent vs Child Transport numbers.
Overview
- What is the purpose of Transport of Copies in SAP?
- How to Create Transport of Copies (TOC) in SAP
- Summary
What is the purpose of Transport of Copies in SAP?
As a Functional Consultant or a Developer, you need to be able to move configurations or code changes to other SAP Environments. This is feasible through SAP Transports.
Let us say that we have the following SAP Environments below:
| SAP Environment | Description |
| SRD | Development System |
| SRQ | Quality / Test System |
| SRR | Release System |
| SRP | Production / Live System |
Let us also consider the scenario where we have a Transport Track setup in the order below.
SRD > SRQ > SRR > SRP
This transport track is like a train. The train follows the route provided above where the SAP Environments are the train stations.

This means that if you release your transport in SRD (Development System), you will find the transport automatically available in SRQ, SRR, and SRP after some time (following the flow above).
“I don’t want this to happen. What if there are changes that need to be done after testing?”.
Now consider a scenario where the changes need to be tested in other SAP Environments before it is moved to the production environment. You could expect some errors to be reported that would entail code or configuration revisions.
Given this concern, you would not want the “unfinalized” or “unapproved” or “unintended” transports to be found in other SAP Environments (train stations).
This is where the functionality of Transport of Copies (TOC) comes in handy. You can move the TOC to a certain SAP environment of your choice (for example, where you intend to test).
This TOC will not be automatically transported across your SAP system landscape (following the transport track). It is a lot “cleaner” and you can ensure that it is not imported into the production system.
Overall, TOC serves as a suitable option for testing purposes in certain SAP environments. You can read more about this behavior in this SAP Help Document.
How to Create Transport of Copies (TOC) in SAP
The idea of Transport of Copies (TOC) is to perform your SAP configurations or code changes in the SAP Development environment and save it in a Transport. Let us call this transport as the “Main Transport”.
Once you’re done saving the changes in the “Main Transport”, you will create a Transport of Copy (TOC) – which contains the same content as your “Main Transport”. You will then release the TOC only and move it to the intended SAP Environment.
The “Main Transport” remains unreleased. Only the TOC is moved.
Below are the detailed steps.
1. In the SAP Development Environments, perform the configurations / code changes and save them in a Transport. This will be your Main Transport. Take note of the Child Transport #.
What is a Child Transport #?
In reference to the image below, SRD334876 (Green Box) is the Child Transport #.

2. Go to Transaction Code SE10 to view that main transport in the Transport Organizer. Press Enter to proceed.

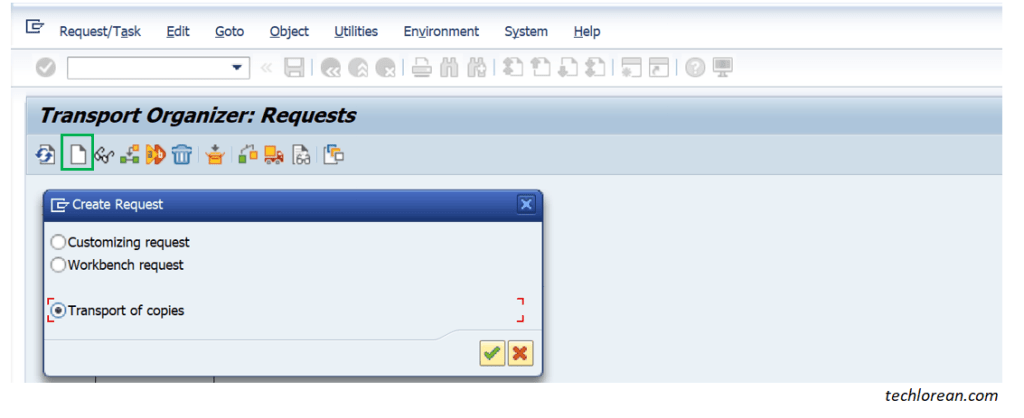
3. Click on the Create Request button (highlighted in red below) and select the “Transport of copies” radio button. Then click on the Check button to proceed.
4. Enter a Short Description for your TOC. Copy the same description / text from your Main Transport and append “TOC”. Be sure to include the Target SAP Environment. Then click on the save button to proceed.
In the example below, I use the format “TOC <Change Request #> <Brief Change Description / Title>”. This naming convention depends on your organization or client preferences.
My personal preference is to include “TOC” and copy the exact text from my main transport. This way, I can easily distinguish TOC’s when it reaches the other SAP Environment/s.

5. Click on the Saved TOC# (Orange Box) then click Request / Task > Object List > Include Objects.

6. Select the Include “Object List from Request” radio button and enter the Child Transport # from your “Main Transport”. Click on the Check button to proceed.
You should see a notification saying “Object Entries from <Child transport #> were passed to <TOC transport #>

“Why am I using the “Child Transport?”
The objects you need are contained in the child transport. If you are free to play around or tinker with the difference between using the child transport # and parent transport #, feel free to do so. This will help you visualize.
7. Release your TOC.
Select the TOC and press F9 or click on the Truck Button to Release.

What are my next steps?
For the next steps, you can go to the Target SAP Environment and to double check if your TOC is visible. Once imported and changes are applied in the target SAP Environment, you can proceed with your testing.
If testing goes well and no additional changes are needed, you can release your “Main Transport” when ready for movement to Production.
If test results require additional changes, you can do a rework in the SAP Development environment and save the changes in the SAME “Main Transport”. Remember: the main transport has not been released.
You can repeat the same TOC procedure (this will be a new TOC#) to bring the updated changes in the target SAP Environment.
Summary
- Perform Configurations / Code Changes and save in a transport (Main Transport).
- Note the Child Transport #
- SE10 Create TOC
- SE10 Enter Short Description for the TOC
- SE10 Request / Task > Object List > Include Objects
- SE10 Include Object List from Request – Copy objects from main transport to TOC
- SE10 Release TOC
I hope this helps. Good luck! 🙂

Nice and detailed. Appreciate it.
LikeLike
Once TOC moved in QAS or sandbox service need to be in activated state but still it is showing yellow but in development it showing green. Service not activated after TOC import. Kindly suggest
LikeLike
Thank u
LikeLike