
This post will provide a step by step scenario of making a minor change in the SAP DME Tree and the testing that follows thereafter.
In this scenario, I will update and existing DME Tree. Only 1 attribute will be changed to reflect a Mapping Procedure of Structure instead of Exit Module.
If you want to understand the purpose and full end to end process of the DME, you can go to this post.
Overview
- Before Changes
- Change Proper
- Post Change Testing – How to Generate DME File
- Additional Information
Before Changes
Before making any changes whatsoever to the DME Tree it is important to create a backup copy of the current active version. This means that you have something to go back to in case there are issues with your modifications.
- Go to Transaction Code DMEE
- Enter the Tree Type and Format Tree Concerned
- Click on Format Tree > Download XML file
- Generated XML file will be your backup copy

NOTE: In case you need to restore the DME tree to the backup, you can repeat the steps but select Upload XML file instead. If the XML file is stored on your laptop, select location as “P” Presentation Server then select the backup file.

Change Proper
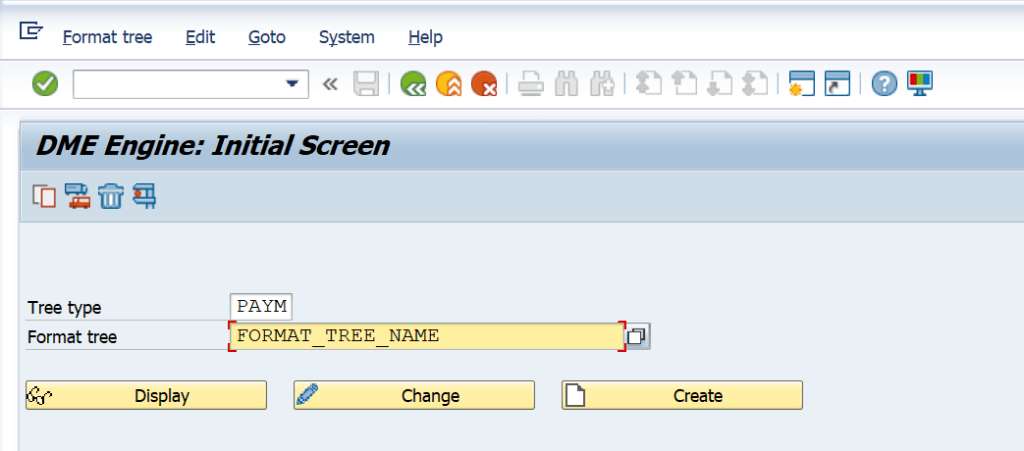
1. Go to Transaction Code DMEE and Enter the Tree Type and Format Tree to be updated.
2. Take note of the DMEE Tree: Properties such as the Last Changed By USERID, DATE, and, TIME.
This is important because these details (highlighted in dark pink) will be your basis to check if the DME Tree is updated.

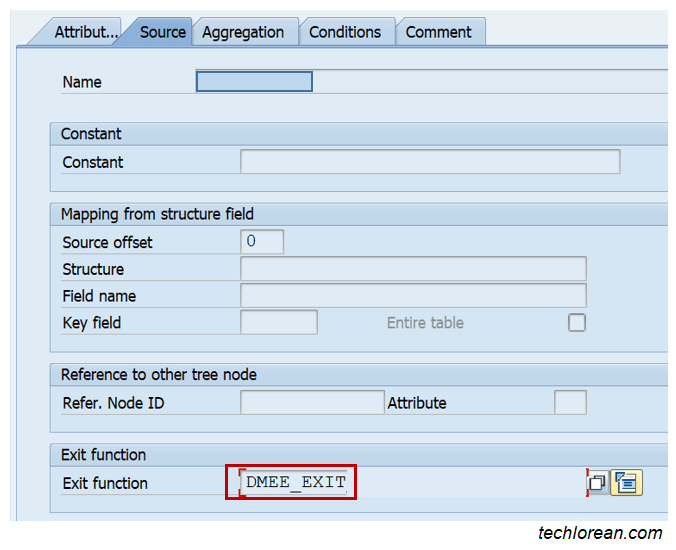
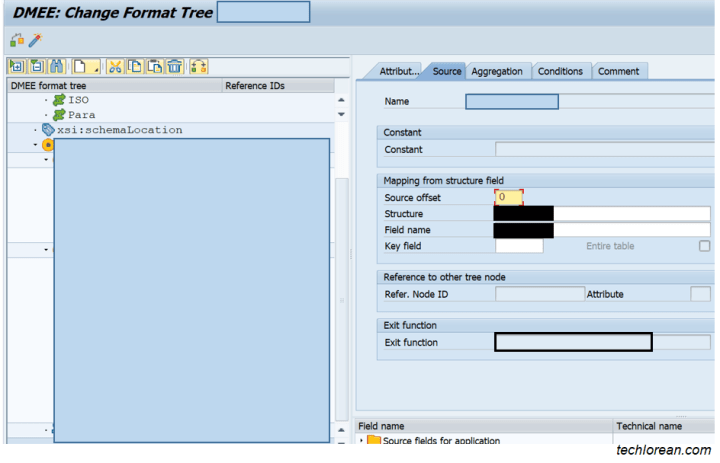
3. Go to or Locate the node you need to change. Notice how the current values are the following (highlighted in red):
- Length: Blank
- Mapping Procedure: Exit module
- Exit Function: DMEE_EXIT

4. Now we will do our change proper by updating the Mapping Procedure from Exit Module to Structure. I changed the following (highlighted in black):
- Length
- Mapping Procedure is now Structure Field
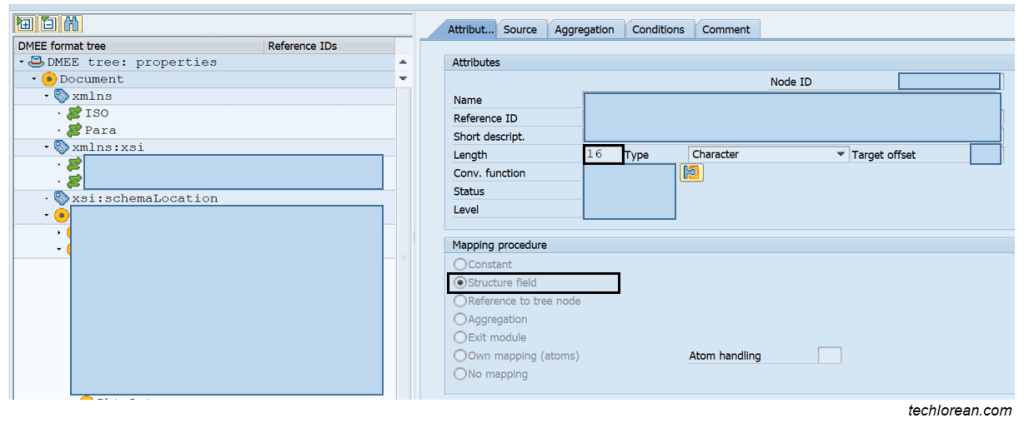
- Source Tab > Source Offset
- Source Tab > Structure
- Source Tab > Field Name
- Exit Function: REMOVED

See Additional Information section below to get insight on why we used the mentioned structure and field name.
5. As soon as I have done my changes, I will click on the Save Button. This will prompt a Workbench Transport Request. Simply fill up the details to create your Transport.

6. If I am sure with the changes, I will now click on the Activate Tree Button (blue wand) and make sure that action is saved in the transport request I created earlier.

7. By Activating the Tree, you should be prompted with a transport request selection then you will receive the notification “Format Tree Activated”.
Note: Save the tree activation in the SAME transport.

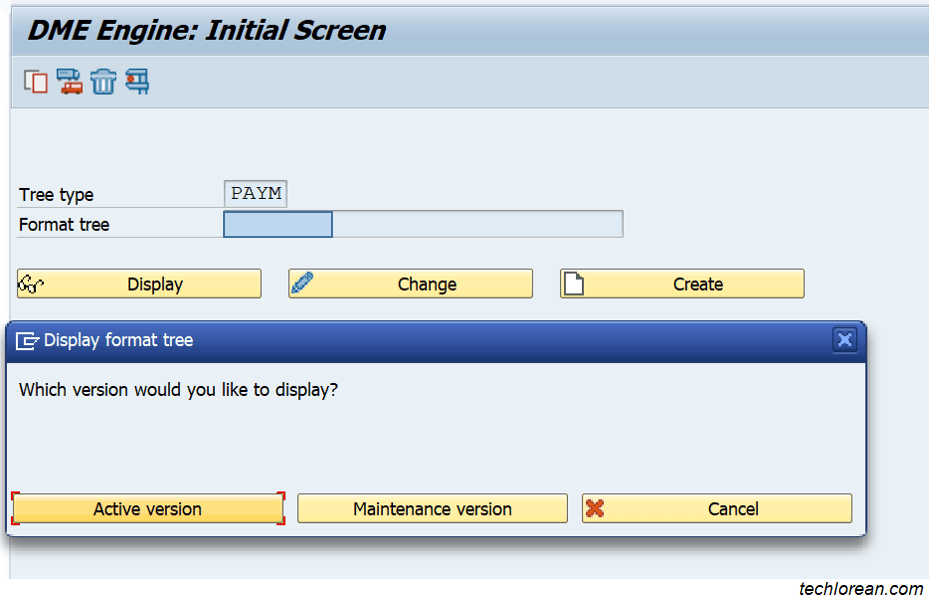
8. You can double check the changes by Selecting the Display option on Transaction Code DMEE. You will be prompted with a question “Which version would you like to display”. Select Active Version.
9. To ensure that you have activated the tree and changes have been saved, check the DMEE Tree: Properties. This would have been updated to the most recent change. In the screenshot below, the color updated from dark pink to light pink (signifying the change).

NOTE: You can always switch your DME tree view by going to Utilities > Versions > Version Management and select the version you want to check.

Post Change Testing – How to Generate DME File
Now we will generate a “realistic” DME file from the updates we have done. I say “realistic” because we can always do a quick test in TCode DMEE to check the XML structure.
In my experience, that is not enough. That approach only provides a high level test of the output. It is always best to do a payment run to see the values that will be populated in the payment medium output.
Remember that DME File = Payment Medium Output.
The steps below assumes we are in the test environment and the transport has been moved to the QA environment.
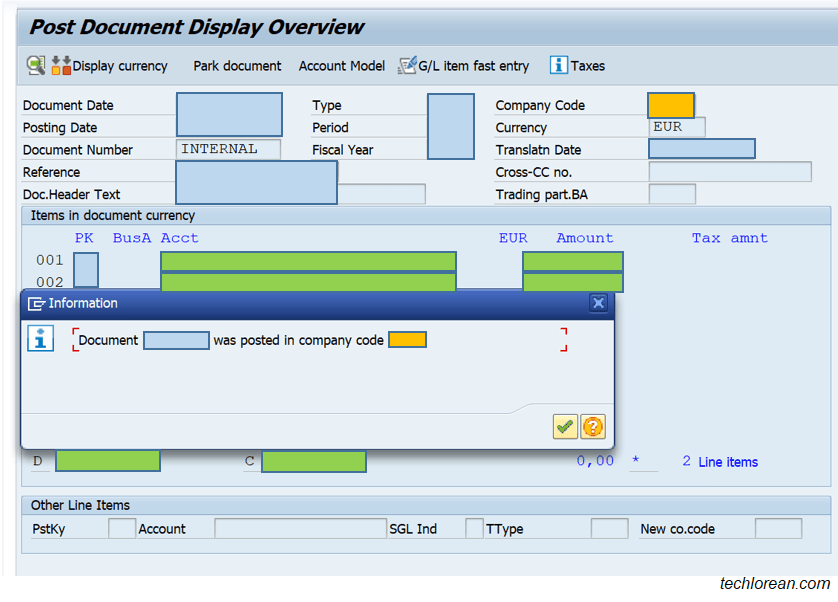
1. First, you need to go to TCode FB01 to create a document that is due for payment. Example: Posting Key 25 Outgoing Payment Vendor Number and Posting Key 35 Incoming Payment. You can use the proper posting keys set up for your scenario / SAP system.
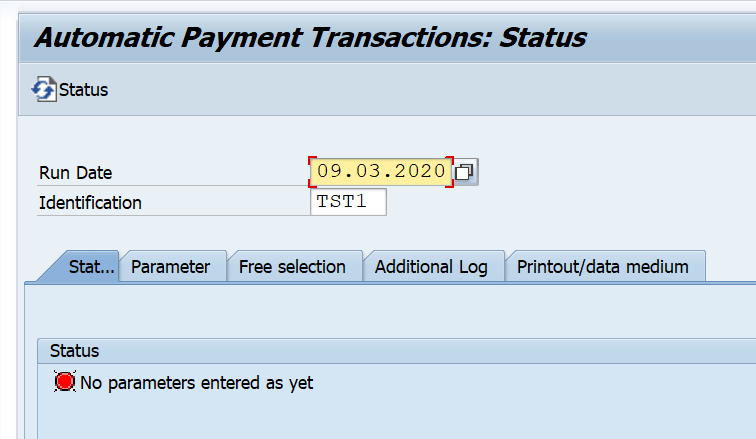
2. Second, you will go to TCode F110 to do a payment run. Enter a Run Date and Payment Identification.
3. Go to the Parameter tab and fill in the details (in line with the test document you created). The goal is to pull the test document (that is due for payment) through the parameters. Make sure to specify the right payment method that triggers the DME setup.

4. I tend to leave the Free Selection Tab blank if I am sure that it will only pull the test document just created. If you want to narrow down your search, you can add some restrictions.
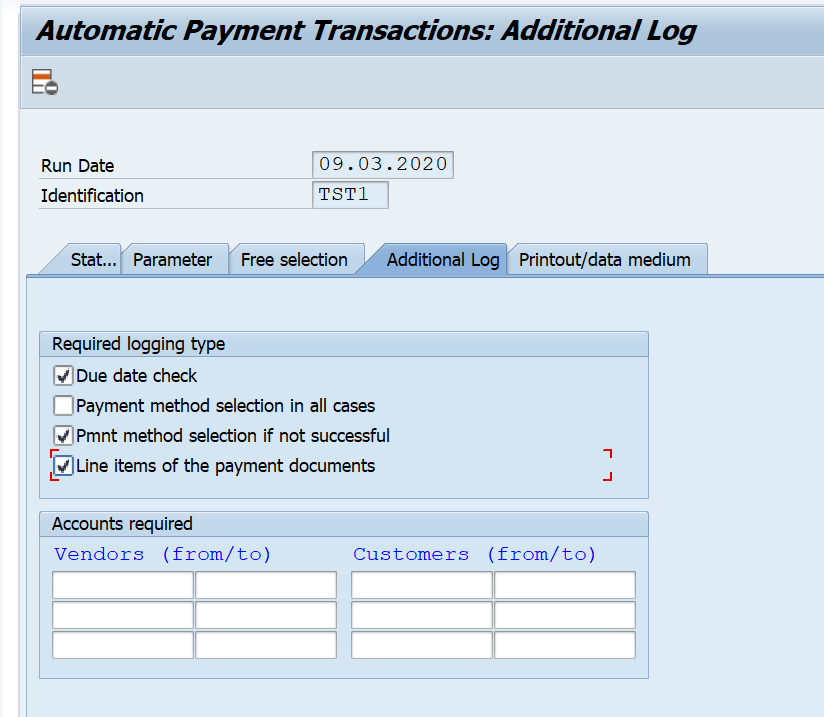
5. For the Additional Log Tab, I tick all the relevant checkboxes I prefer to show up on the payment run log.
6. I also leave the Printout / Data Medium Tab blank since the current configuration in SAP will work just fine without it. It will still trigger the DME payment medium format accurately.
NOTE: At the end of the day, it is best to pattern a realistic scenario in production. So, if you need to specify a printout in your test, feel free to do so.
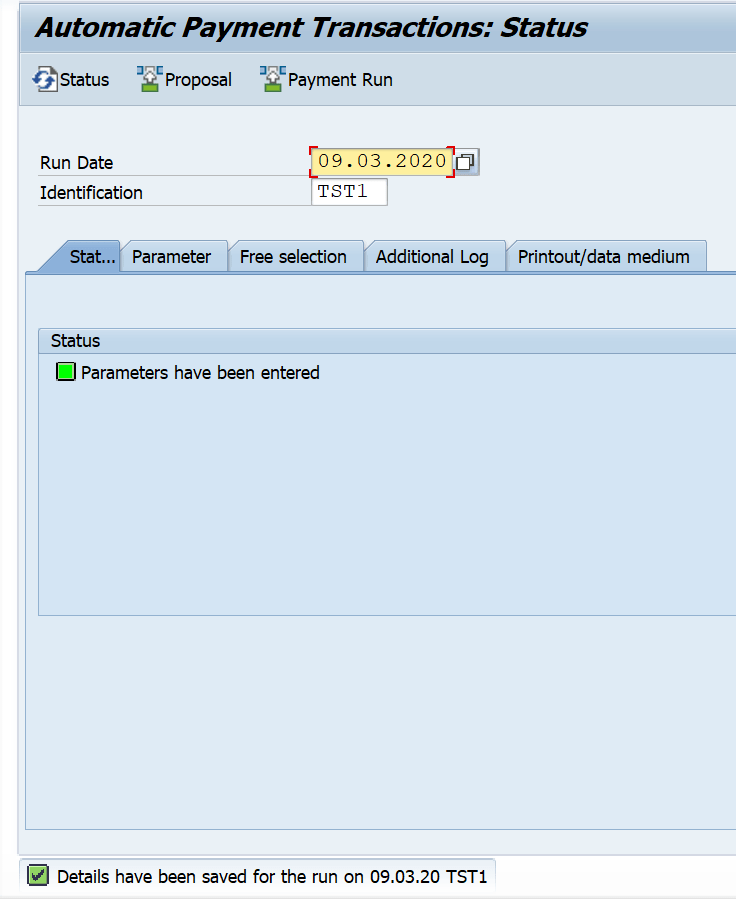
7. Finally, you can save the payment run parameter details.
8. This time we will do a Payment Proposal Run by clicking on the “Proposal” Button. At this point, you do not need to tick the create payment medium checkbox.

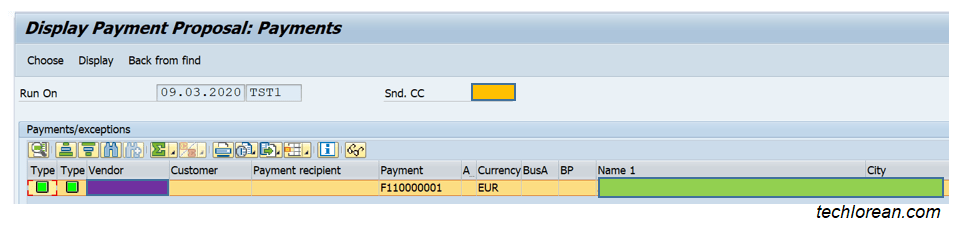
9. Once done, you can check on the proposal details by clicking on the Proposal Button (with eyeglasses icon). In the screenshot below you will notice that it was able to successfully pull the test document and the corresponding details.
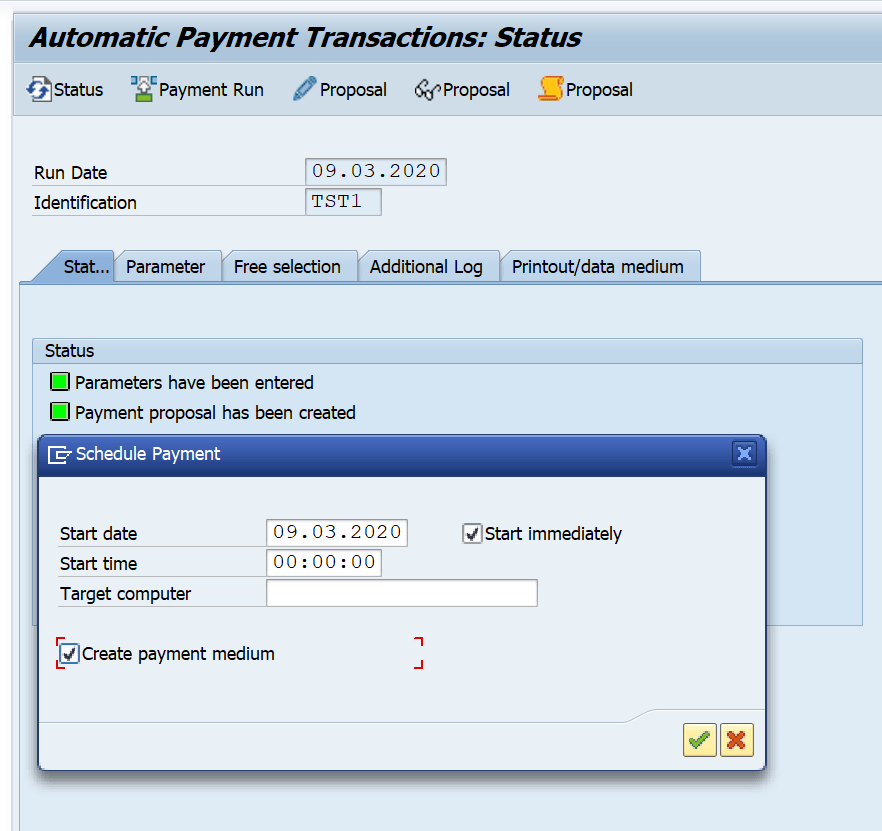
10. This time we will finally do a Payment Run by clicking on the “Payment Run” Button. At this point, you NEED to tick the create payment medium checkbox. By doing this step, you will generate the DME file.
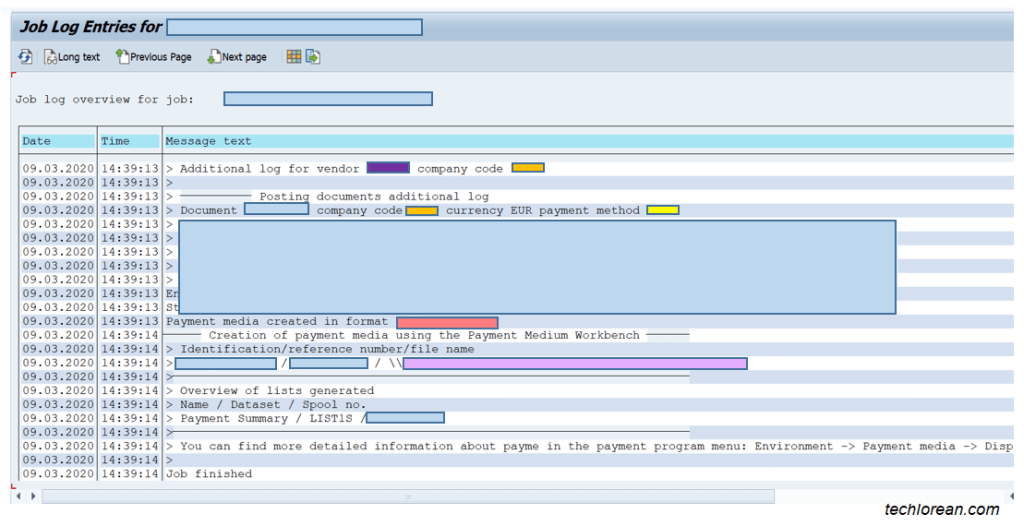
11. If payment run goes well, you will see the posting order results below. You can click on the “Payment” button to review the details.

In the screenshot below you will notice that the vendor, company code, payment method, and generated document number details are included in the log.
The format used for payment medium is also included (highlighted in dark pink). You can also find the location of where the generated DME file (payment medium output) was saved (highlighted in light purple).
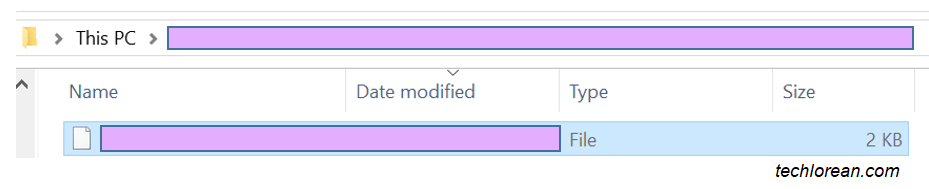
12. Depending on the setup, the DME file can go to a designated secured folder or you can always check through transaction code AL11. In my case, I can directly go to the secured folder to check on the generated file. I can also do a quick check on the generated xml details by viewing the file.
Additional Information
How do I know which Structure and Field to use for SAP DME Tree?
In our example, we used Structure FPAYHX and Field Name RENUM. Basically, this approach is telling the DME tree to pull a specific populated value (RENUM) from the indicated structure (FPAYHX). In simple words: we want the DME file to include a reference number from the payment run.
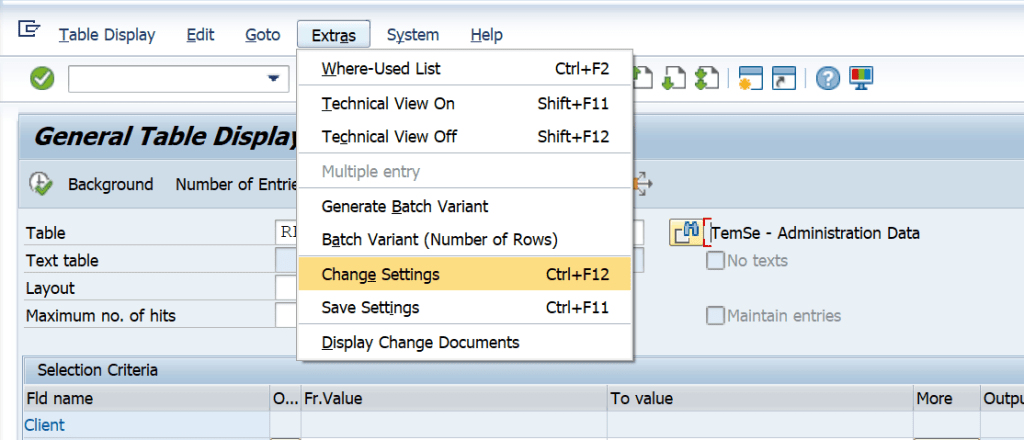
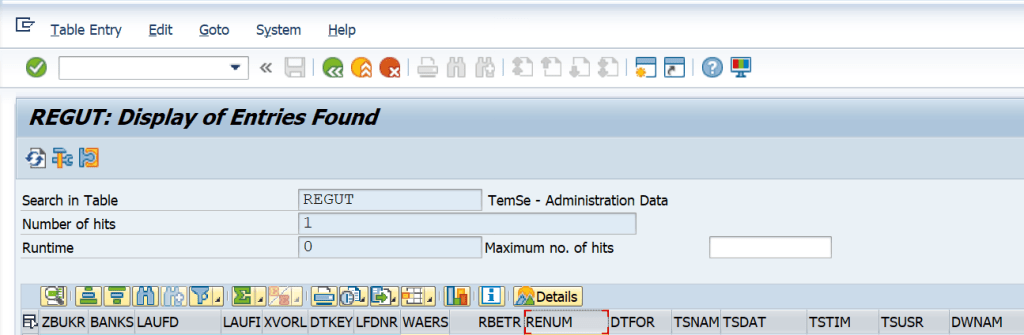
To help you visualize, let us first refer to Table REGUT with the field RENUM.

Notice how the Reference Number field name coincides with technical name RENUM. To help you visualize the technical names easier, you can go to Extras > Change Settings > Select Technical Name as Column Heading.
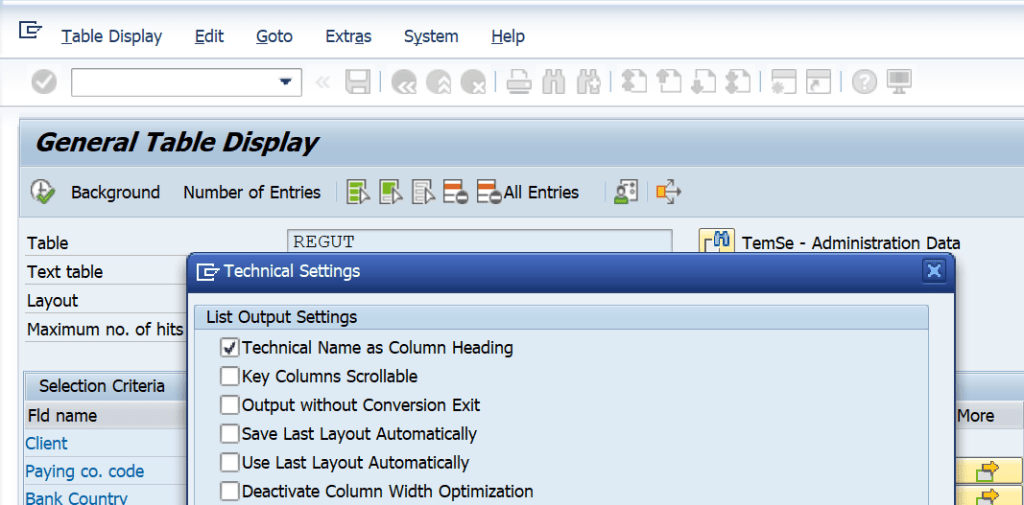
You should now see the technical names as headings and quickly check on the Reference Number (RENUM). This is the reference number you can refer to for table checking.
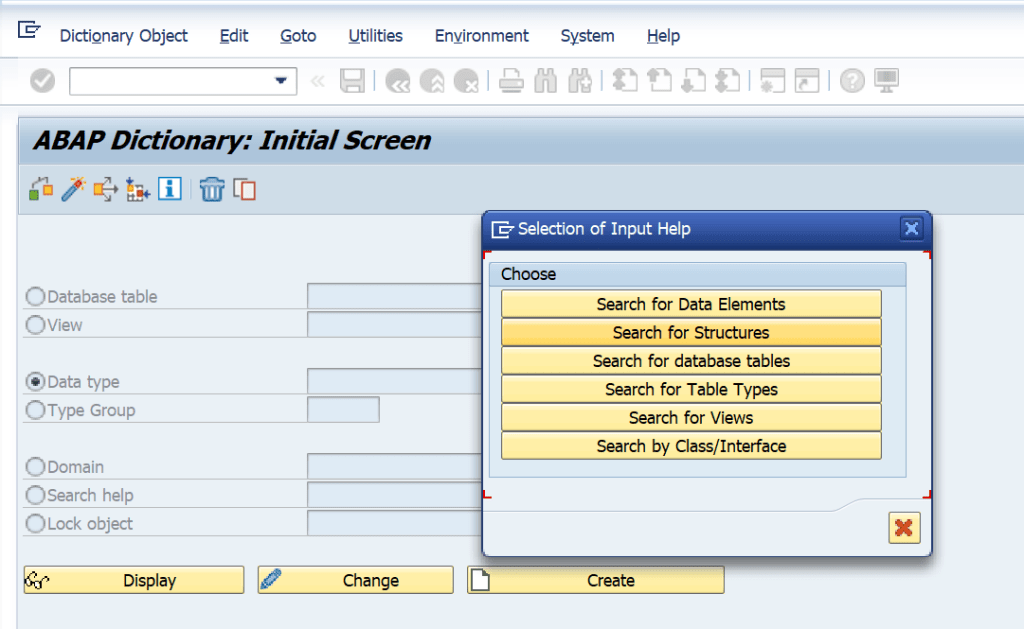
In line with what we found in Field RENUM, let us now go to TCode SE11. To search for the corresponding Structure: Select Data Type then choose “Search for Structures”.
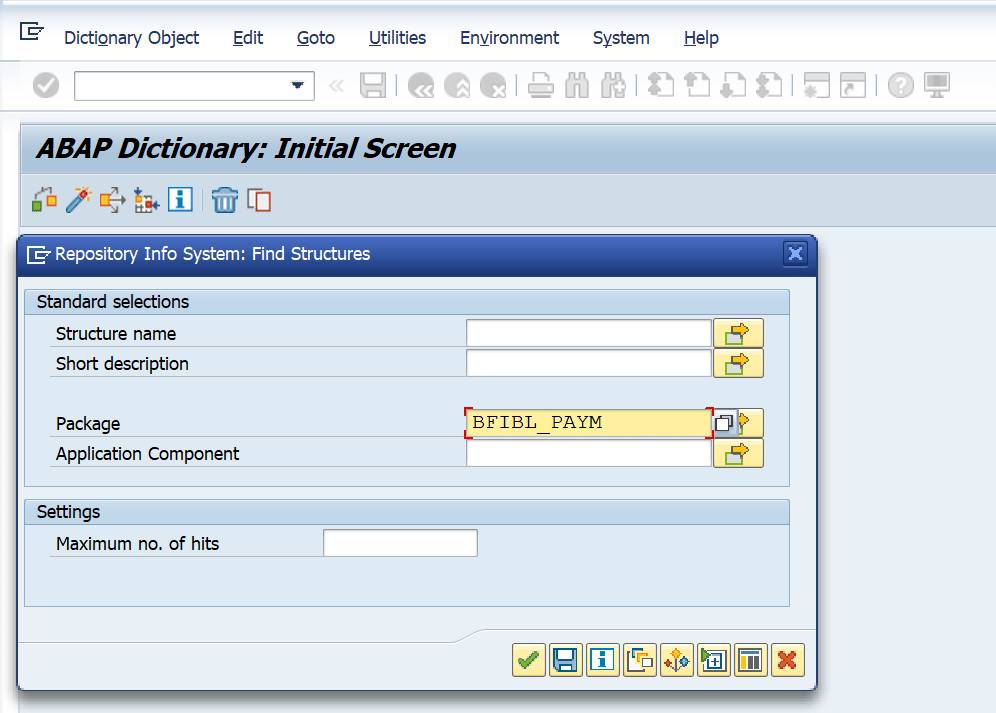
In the Find Structures window, enter “BFIBL_PAYM” package then click on the Check Button. BFIBL_PAYM is the standard SAP ABAP Package for Payment Medium.
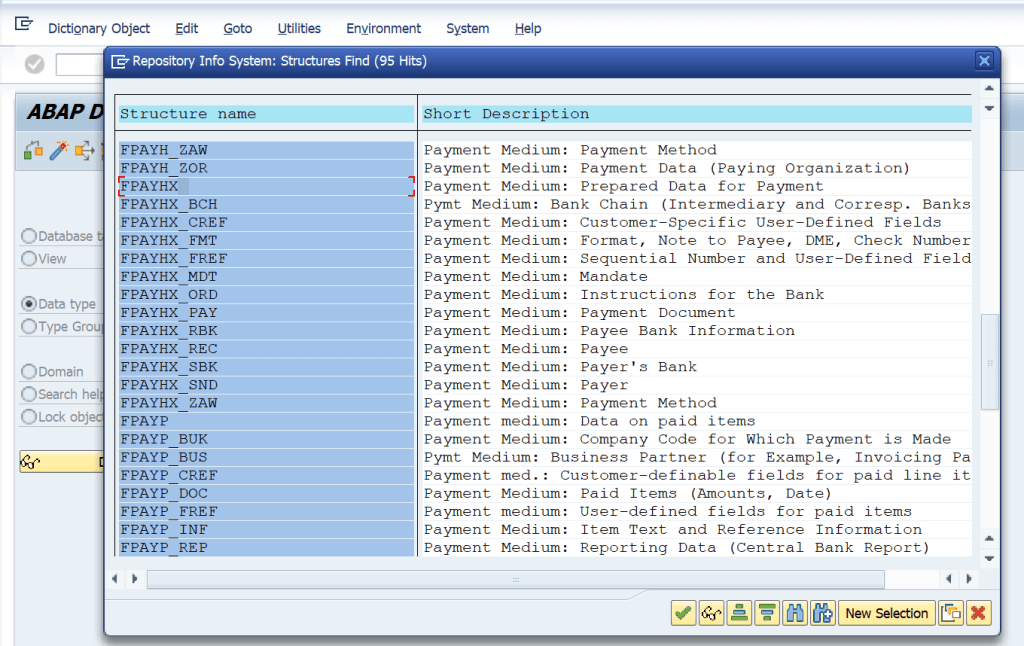
You should now see a list of available Structures for your review / analysis. Once you have selected a Structure, double click on the row to see more details. In our example, we used FPAYHX Structure to target the “Payment Medium: Prepared Data for Payment”.
You should eventually end up with the screen below. Notice how we can see the specific component “RENUM” as the Reference Number. Thus, the utilization of FPAYHX-RENUM.

What is the link of FPAYHX and Table REGUT?
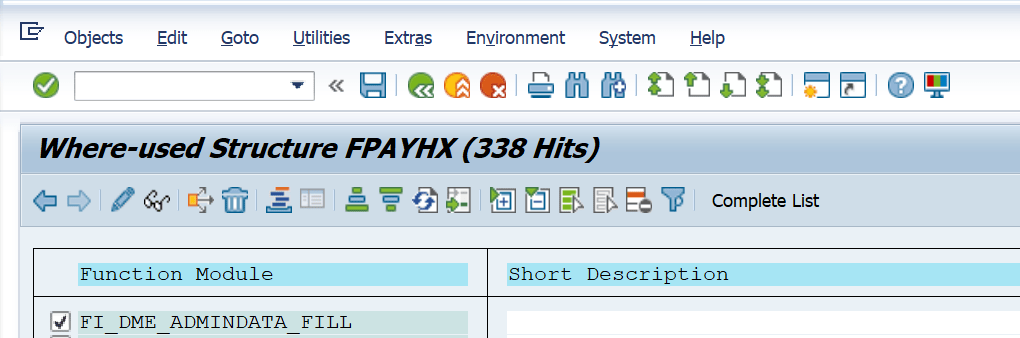
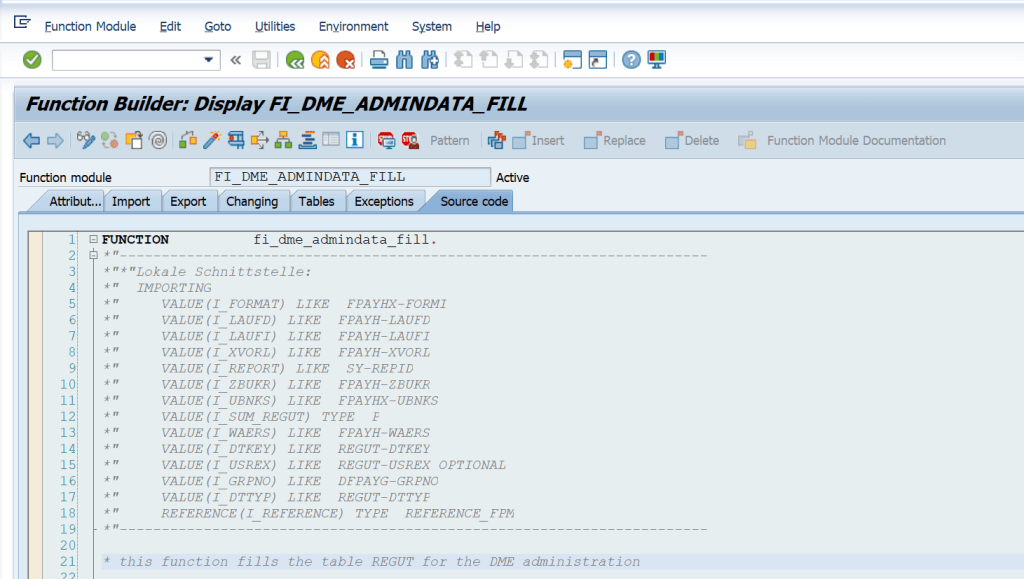
To get a high level overview on how they relate to one another, you can always click on the Where-Used Button (three-arrow box beside the activation wand) of Structure FPAYHX. You can then try to locate Function Module “FI_DME_ADMINDATA_FILL” and double click on it.
After double clicking on the Function Module, you should see the code below. Notice how there are instances of FPAYHX and REGUT. Both of these are related to DME administration and the creation of the DME output / file. You can explore more at your own pace by looking through the code if needed.
I hope this helps. Good luck! 🙂
Other Learning Alternatives
Looking for an on-the-go copy of all DME topics? Check out “SAP Data Medium Exchange eBook by Techlorean“.


If you are planning to hide everything, dont write anything.
LikeLike